Friday, November 30, 2012

Configuring MongoDB Replication on RedHat Linux nodes

In this post I’ll look at configuring replication in MongoDB. In my setup I have 2 x RedHat Linux nodes that will act as the Primary and Secondary for my MongoDB replication set.

I began by downloading MongoDB on both the nodes of the replication set.

[root@isvx7 ~]# cd mongodb
[root@isvx7 ~]# wget ftp://ftp.muug.mb.ca/mirror/fedora/epel/5/x86_64/ganglia-3.0.7-1.el5.x86_64.rpm
[root@isvx7 mongodb]# ls
mongodb-linux-x86_64-2.2.0      mongodb-linux-x86_64-2.2.0.tar
[root@isvx7 mongodb]#

My MongoDB replication set will be called liverpool, and “anfield1” and “anfield2” will be the two dbpaths on each of the nodes respectively.

[root@isvx7 ~]# mkdir anfield1
[root@isvx3 ~]# mkdir anfield2

Next I started the mongod server passing it the replication set name, and the dbpath. I also use port 27001 and limited the oplogSize to 50

[root@isvx7 ~]# mongod --replSet liverpool --dbpath anfield1 --port 27001 --oplogSize 50
<some related configuration messages>
Fri Nov 30 16:13:36 [rsStart] replSet can't get local.system.replset config from self or any seed (EMPTYCONFIG)
Fri Nov 30 16:13:46 [rsStart] replSet can't get local.system.replset config from self or any seed (EMPTYCONFIG)

Next I went and did the same thing on the other node ie. isvx3

 [root@isvx3 ~]# mongod --replSet liverpool --dbpath anfield2 --port 27001 --oplogSize 50
<some related configuration messages>
Fri Nov 30 15:17:17 [rsStart] replSet can't get local.system.replset config from self or any seed (EMPTYCONFIG)
Fri Nov 30 15:17:27 [rsStart] replSet can't get local.system.replset config from self or any seed (EMPTYCONFIG)

Right now both these nodes know that they are part of the “liverpool” replication set, but that is about it. They don’t know who else is part of the same replication set.

So when I connect to the mongod server on isvx7, it tells me that is not the master or the secondary.

[root@isvx7 ~]# mongo --port 27001
MongoDB shell version: 2.2.0
connecting to: 127.0.0.1:27001/test
> db.isMaster()
{
        "ismaster" : false,
        "secondary" : false,
        "info" : "can't get local.system.replset config from self or any seed (EMPTYCONFIG)",
        "isreplicaset" : true,
        "maxBsonObjectSize" : 16777216,
        "localTime" : ISODate("2012-11-30T23:22:44.236Z"),
        "ok" : 1
}
>

This means that I would need to run replSetInitiate to initiate the replication set on the nodes, but before that we need to create the config file on node isvx7.

> cfg = { _id : "liverpool", members : [ { _id:0, host:"isvx7:27001" }, { _id:1, host:"isvx3:27001" } ] }
{
        "_id" : "liverpool",
        "members" : [
                {
                        "_id" : 0,
                        "host" : "isvx7:27001"
                },
                {
                        "_id" : 1,
                        "host" : "isvx3:27001"
                }
        ]
}
>

Now we will initiate the replica set on node isvx7 with the config file that we created.

> rs.initiate(cfg)
{
        "info" : "Config now saved locally.  Should come online in about a minute.",
        "ok" : 1
}
>

When we now do the db.isMaster() on isvx7, we see that it is the master/primary.

> db.isMaster()
{
        "setName" : "liverpool",
        "ismaster" : true,
        "secondary" : false,
        "hosts" : [
                "isvx7:27001",
                "isvx3:27001"
        ],
        "primary" : "isvx7:27001",
        "me" : "isvx7:27001",
        "maxBsonObjectSize" : 16777216,
        "localTime" : ISODate("2012-11-30T23:51:11.561Z"),
        "ok" : 1
}
liverpool:PRIMARY>

Here is what I see when I try to start the shell from the secondary node.

[root@isvx3 ~]#  mongo --port 27001
MongoDB shell version: 2.2.0
connecting to: 127.0.0.1:27001/test
Welcome to the MongoDB shell.
For interactive help, type "help".
For more comprehensive documentation, see
        http://docs.mongodb.org/
Questions? Try the support group
        http://groups.google.com/group/mongodb-user
liverpool:SECONDARY>
liverpool:SECONDARY> db.isMaster()
{
        "setName" : "liverpool",
        "ismaster" : false,
        "secondary" : true,
        "hosts" : [
                "isvx3:27001",
                "isvx7:27001"
        ],
        "primary" : "isvx7:27001",
        "me" : "isvx3:27001",
        "maxBsonObjectSize" : 16777216,
        "localTime" : ISODate("2012-12-01T00:03:49.245Z"),
        "ok" : 1
}
liverpool:SECONDARY>

Friday, October 26, 2012

Install and configure MongoDB on Linux

I decided to play around with MongoDB a bit, so I downloaded it from http://www.mongodb.org/downloads as follows

[root@isvx7 ~]# mkdir mongodb
[root@isvx7 ~]# cd mongodb
[root@isvx7 mongodb]# wget http://fastdl.mongodb.org/linux/mongodb-linux-x86_64-2.2.0.tgz
--2012-10-26 11:15:58--  http://fastdl.mongodb.org/linux/mongodb-linux-x86_64-2.2.0.tgz
Resolving fastdl.mongodb.org... 54.240.190.202, 54.240.190.201, 54.240.190.172, ...
Connecting to fastdl.mongodb.org|54.240.190.202|:80... connected.
HTTP request sent, awaiting response... 200 OK
Length: 56286069 (54M) [application/x-tar]
Saving to: `mongodb-linux-x86_64-2.2.0.tgz'

100%[======================================>] 56,286,069  5.97M/s   in 9.3s

2012-10-26 11:16:07 (5.75 MB/s) - `mongodb-linux-x86_64-2.2.0.tgz' saved [56286069/56286069]

[root@isvx7 mongodb]#
[root@isvx7 mongodb]# gunzip mongodb-linux-x86_64-2.2.0.tgz
[root@isvx7 mongodb]# ls
mongodb-linux-x86_64-2.2.0.tar
[root@isvx7 mongodb]# tar -xvf mongodb-linux-x86_64-2.2.0.tar
mongodb-linux-x86_64-2.2.0/GNU-AGPL-3.0
mongodb-linux-x86_64-2.2.0/README
mongodb-linux-x86_64-2.2.0/THIRD-PARTY-NOTICES
mongodb-linux-x86_64-2.2.0/bin/mongodump
mongodb-linux-x86_64-2.2.0/bin/mongorestore
mongodb-linux-x86_64-2.2.0/bin/mongoexport
mongodb-linux-x86_64-2.2.0/bin/mongoimport
mongodb-linux-x86_64-2.2.0/bin/mongostat
mongodb-linux-x86_64-2.2.0/bin/mongotop
mongodb-linux-x86_64-2.2.0/bin/mongooplog
mongodb-linux-x86_64-2.2.0/bin/mongofiles
mongodb-linux-x86_64-2.2.0/bin/bsondump
mongodb-linux-x86_64-2.2.0/bin/mongoperf
mongodb-linux-x86_64-2.2.0/bin/mongosniff
mongodb-linux-x86_64-2.2.0/bin/mongod
mongodb-linux-x86_64-2.2.0/bin/mongos
mongodb-linux-x86_64-2.2.0/bin/mongo
[root@isvx7 mongodb]# ls
mongodb-linux-x86_64-2.2.0  mongodb-linux-x86_64-2.2.0.tar
[root@isvx7 mongodb]# cd mongodb-linux-x86_64-2.2.0
[root@isvx7 mongodb-linux-x86_64-2.2.0]# ls
bin  GNU-AGPL-3.0  README  THIRD-PARTY-NOTICES
[root@isvx7 mongodb-linux-x86_64-2.2.0]# ls -l
total 56
drwxr-xr-x 2 root  root   4096 Oct 26 11:17 bin
-rw------- 1 admin admin 34520 Aug 13 10:38 GNU-AGPL-3.0
-rw------- 1 admin admin  1359 Aug 13 10:38 README
-rw------- 1 admin admin 11527 Aug 21 06:34 THIRD-PARTY-NOTICES
[root@isvx7 mongodb-linux-x86_64-2.2.0]# cd bin
[root@isvx7 bin]# ls
bsondump  mongodump    mongoimport  mongorestore  mongostat
mongo     mongoexport  mongooplog   mongos        mongotop
mongod    mongofiles   mongoperf    mongosniff
[root@isvx7 bin]#

By default mongodb uses /data/db for its datafiles. Below I check to see if I have enough space on / to create /data/db and have some files in it.

[root@isvx7 ~]# df -h /
Filesystem            Size  Used Avail Use% Mounted on
/dev/sda3             255G   76G  166G  32% /
[root@isvx7 ~]# mkdir -p /data/db
[root@isvx7 ~]#

Next, I start the server mongod, and strace it.

[root@isvx7 bin]# strace -o /root/output.txt ./mongod
./mongod --help for help and startup options
Fri Oct 26 15:07:52 [initandlisten] MongoDB starting : pid=31518 port=27017 dbpath=/data/db/ 64-bit host=isvx7.storage.tucson.ibm.com
Fri Oct 26 15:07:52 [initandlisten]
Fri Oct 26 15:07:52 [initandlisten] ** WARNING: You are running on a NUMA machine.
Fri Oct 26 15:07:52 [initandlisten] **          We suggest launching mongod like this to avoid performance problems:
Fri Oct 26 15:07:52 [initandlisten] **              numactl --interleave=all mongod [other options]
Fri Oct 26 15:07:52 [initandlisten]
Fri Oct 26 15:07:52 [initandlisten] ** WARNING: /proc/sys/vm/zone_reclaim_mode is 1
Fri Oct 26 15:07:52 [initandlisten] **          We suggest setting it to 0
Fri Oct 26 15:07:52 [initandlisten] **          http://www.kernel.org/doc/Documentation/sysctl/vm.txt
Fri Oct 26 15:07:52 [initandlisten]
Fri Oct 26 15:07:52 [initandlisten] db version v2.2.0, pdfile version 4.5
Fri Oct 26 15:07:52 [initandlisten] git version: f5e83eae9cfbec7fb7a071321928f00d1b0c5207
Fri Oct 26 15:07:52 [initandlisten] build info: Linux ip-10-2-29-40 2.6.21.7-2.ec2.v1.2.fc8xen #1 SMP Fri Nov 20 17:48:28 EST 2009 x86_64 BOOST_LIB_VERSION=1_49
Fri Oct 26 15:07:52 [initandlisten] options: {}
Fri Oct 26 15:07:52 [initandlisten] journal dir=/data/db/journal
Fri Oct 26 15:07:52 [initandlisten] recover : no journal files present, no recovery needed
Fri Oct 26 15:07:54 [initandlisten] preallocateIsFaster=true 28.32
Fri Oct 26 15:07:56 [initandlisten] preallocateIsFaster=true 27.74
Fri Oct 26 15:07:59 [initandlisten] preallocateIsFaster=true 30.82
Fri Oct 26 15:07:59 [initandlisten] preallocateIsFaster check took 7.423 secs
Fri Oct 26 15:07:59 [initandlisten] preallocating a journal file /data/db/journal/prealloc.0
Fri Oct 26 15:08:11 [initandlisten] preallocating a journal file /data/db/journal/prealloc.1
Fri Oct 26 15:08:23 [initandlisten] preallocating a journal file /data/db/journal/prealloc.2
Fri Oct 26 15:08:36 [websvr] admin web console waiting for connections on port 28017
Fri Oct 26 15:08:36 [initandlisten] waiting for connections on port 27017

Here is what got created under /data/db

[root@isvx7 ~]# cd /data/db
[root@isvx7 db]# ls
journal  mongod.lock
[root@isvx7 db]# ls -l
total 8
drwxr-xr-x 2 root root 4096 Oct 26 15:08 journal
-rwxr-xr-x 1 root root    6 Oct 26 15:07 mongod.lock
[root@isvx7 db]# cd journal/
[root@isvx7 journal]# ls
j._0  prealloc.1  prealloc.2
[root@isvx7 journal]# ls -lh
total 3.1G
-rw------- 1 root root 1.0G Oct 26 15:08 j._0
-rw------- 1 root root 1.0G Oct 26 15:08 prealloc.1
-rw------- 1 root root 1.0G Oct 26 15:08 prealloc.2
[root@isvx7 journal]#

Let us look into the output.txt to see the what happens when mongod is run.
  • Here we see that it checks to see if /data/db directory is present, and then goes onto check if mongod.lock file is present. It see that it is not there, so it goes onto create a mongod.lock file and writes 31518 into it which is the process id of mongod ie. "root     31518 31517  0 15:07 pts/2    00:00:04 ./mongod"
write(1, "Fri Oct 26 15:07:52 [initandlist"..., 48) = 48
stat("/data/db/", {st_mode=S_IFDIR|0755, st_size=4096, ...}) = 0
stat("/data/db/mongod.lock", 0x7fffc6e703b0) = -1 ENOENT (No such file or directory)
open("/data/db/mongod.lock", O_RDWR|O_CREAT, 0777) = 4
flock(4, LOCK_EX|LOCK_NB)               = 0
ftruncate(4, 0)                         = 0
write(4, "31518\n", 6)                  = 6
fsync(4)                                = 0
  • Here you see that it checks to see if /data/db/journal is present, and then goes onto check i
write(1, "Fri Oct 26 15:07:52 [initandlist"..., 65) = 65
stat("/data/db/journal", 0x7fffc6e704d0) = -1 ENOENT (No such file or directory)
mkdir("/data/db/journal", 0777)         = 0
stat("/data/db/journal", {st_mode=S_IFDIR|0755, st_size=4096, ...}) = 0
open("/data/db/journal", O_RDONLY|O_NONBLOCK|O_DIRECTORY) = 5
fcntl(5, F_SETFD, FD_CLOEXEC)           = 0
getdents(5, /* 2 entries */, 32768)     = 48
getdents(5, /* 0 entries */, 32768)     = 0
close(5)                                = 0
  • Here we see it checks to see if files prealloc.0, prealloc.1, and prealloc.2 are present.
stat("/data/db/journal/prealloc.0", 0x7fffc6e703f0) = -1 ENOENT (No such file or directory)
stat("/data/db/journal/prealloc.1", 0x7fffc6e703f0) = -1 ENOENT (No such file or directory)
stat("/data/db/journal/prealloc.2", 0x7fffc6e703f0) = -1 ENOENT (No such file or directory)
stat("/data/db/journal/prealloc.0", 0x7fffc6e704f0) = -1 ENOENT (No such file or directory)
stat("/data/db/journal/prealloc.1", 0x7fffc6e704f0) = -1 ENOENT (No such file or directory)
stat("/data/db/journal/tempLatencyTest", 0x7fffc6e703c0) = -1 ENOENT (No such file or directory)
  • Next it creates the tempLatencyTest file, and writes to it as shown below.
open("/data/db/journal/tempLatencyTest", O_WRONLY|O_CREAT|O_DIRECT|O_NOATIME, 0600) = 5
open("/data/db/journal", O_RDONLY)      = 6
fsync(6)                                = 0
close(6)                                = 0
lseek(5, 0, SEEK_CUR)                   = 0
write(5, "\0\0\0\0\0\0\0\0\0\0\0\0\0\0\0\0\0\0\0\0\0\0\0\0\0\0\0\0\0\0\0\0"..., 8192) = 8192
fdatasync(5)                            = 0
lseek(5, 0, SEEK_CUR)                   = 8192
write(5, "\0\0\0\0\0\0\0\0\0\0\0\0\0\0\0\0\0\0\0\0\0\0\0\0\0\0\0\0\0\0\0\0"..., 8192) = 8192
fdatasync(5)                            = 0
lseek(5, 0, SEEK_CUR)                   = 16384
write(5, "\0\0\0\0\0\0\0\0\0\0\0\0\0\0\0\0\0\0\0\0\0\0\0\0\0\0\0\0\0\0\0\0"..., 8192) = 8192
fdatasync(5)                            = 0
...........................................................
...........................................................
...........................................................
lseek(5, 0, SEEK_CUR)                   = 393216
write(5, "\0\0\0\0\0\0\0\0\0\0\0\0\0\0\0\0\0\0\0\0\0\0\0\0\0\0\0\0\0\0\0\0"..., 8192) = 8192
fdatasync(5)                            = 0
lseek(5, 0, SEEK_CUR)                   = 401408
write(5, "\0\0\0\0\0\0\0\0\0\0\0\0\0\0\0\0\0\0\0\0\0\0\0\0\0\0\0\0\0\0\0\0"..., 8192) = 8192
fdatasync(5)                            = 0
close(5)  
                             = 0

open("/data/db/journal/tempLatencyTest", O_WRONLY|O_CREAT|O_DIRECT|O_NOATIME, 0600) = 5
open("/data/db/journal", O_RDONLY)      = 6
fsync(6)                                = 0
close(6)                                = 0
lseek(5, 0, SEEK_CUR)                   = 0
write(5, "\0\0\0\0\0\0\0\0\0\0\0\0\0\0\0\0\0\0\0\0\0\0\0\0\0\0\0\0\0\0\0\0"..., 8192) = 8192
fdatasync(5)                            = 0
lseek(5, 0, SEEK_CUR)                   = 8192
write(5, "\0\0\0\0\0\0\0\0\0\0\0\0\0\0\0\0\0\0\0\0\0\0\0\0\0\0\0\0\0\0\0\0"..., 8192) = 8192
fdatasync(5)                            = 0
lseek(5, 0, SEEK_CUR)                   = 16384
write(5, "\0\0\0\0\0\0\0\0\0\0\0\0\0\0\0\0\0\0\0\0\0\0\0\0\0\0\0\0\0\0\0\0"..., 8192) = 8192
fdatasync(5)
                           = 0
...........................................................
...........................................................
...........................................................
fdatasync(5)                            = 0
lseek(5, 0, SEEK_CUR)                   = 393216
write(5, "\0\0\0\0\0\0\0\0\0\0\0\0\0\0\0\0\0\0\0\0\0\0\0\0\0\0\0\0\0\0\0\0"..., 8192) = 8192
fdatasync(5)                            = 0
lseek(5, 0, SEEK_CUR)                   = 401408
write(5, "\0\0\0\0\0\0\0\0\0\0\0\0\0\0\0\0\0\0\0\0\0\0\0\0\0\0\0\0\0\0\0\0"..., 8192) = 8192
fdatasync(5)                            = 0
close(5)                                = 0
  • Here we see that the tempLatencyTest file is deleted.
write(1, "Fri Oct 26 15:07:54 [initandlist"..., 67) = 67
stat("/data/db/journal/tempLatencyTest", {st_mode=S_IFREG|0600, st_size=409600, ...}) = 0
lstat("/data/db/journal/tempLatencyTest", {st_mode=S_IFREG|0600, st_size=409600, ...}) = 0
unlink("/data/db/journal/tempLatencyTest") = 0
stat("/data/db/journal/tempLatencyTest", 0x7fffc6e703c0) = -1 ENOENT (No such file or directory
  • Next we see that the file prealloc.0 is created, and 1 MB is written into it using pwrite to create a totalof 1 GB. The same is repeated for file prealloc.1 and prealloc.2
"Prealloc Files (e.g. journal/prealloc.0)

mongod will create prealloc files in the journal directory under some circumstances to minimize journal write latency. On some filesystems, appending to a file and making it larger can be slower than writing to a file of a predefined size. mongod checks this at startup and if it finds this to be the case will use preallocated journal files. If found to be helpful, a small pool of prealloc files will be created in the journal directory before startup begins. This is a one time initiation and does not occur with future invocations. Approximately 3GB of files will be preallocated (and truly prewritten, not sparse allocated) - thus in this situation, expect roughly a 3 minute delay on the first startup to preallocate these files."
From MongoDb docs: http://www.mongodb.org/display/DOCS/Journaling+Administration+Notes#JournalingAdministrationNotes-PreallocFiles%28e.g.journal%2Fprealloc.0%29

open("/data/db/journal/prealloc.0", O_RDWR|O_CREAT|O_NOATIME, 0600) = 5
pwrite(5, "\0\0\0\0\0\0\0\0\0\0\0\0\0\0\0\0\0\0\0\0\0\0\0\0\0\0\0\0\0\0\0\0"..., 1048576, 0) = 1048576
pwrite(5, "\0\0\0\0\0\0\0\0\0\0\0\0\0\0\0\0\0\0\0\0\0\0\0\0\0\0\0\0\0\0\0\0"..., 1048576, 1048576) = 1048576
pwrite(5, "\0\0\0\0\0\0\0\0\0\0\0\0\0\0\0\0\0\0\0\0\0\0\0\0\0\0\0\0\0\0\0\0"..., 1048576, 2097152) = 1048576
pwrite(5, "\0\0\0\0\0\0\0\0\0\0\0\0\0\0\0\0\0\0\0\0\0\0\0\0\0\0\0\0\0\0\0\0"..., 1048576, 3145728) = 1048576
pwrite(5, "\0\0\0\0\0\0\0\0\0\0\0\0\0\0\0\0\0\0\0\0\0\0\0\0\0\0\0\0\0\0\0\0"..., 1048576, 4194304) = 1048576
pwrite(5, "\0\0\0\0\0\0\0\0\0\0\0\0\0\0\0\0\0\0\0\0\0\0\0\0\0\0\0\0\0\0\0\0"..., 1048576, 5242880) = 1048576
..............................................................
..............................................................
..............................................................
pwrite(5, "\0\0\0\0\0\0\0\0\0\0\0\0\0\0\0\0\0\0\0\0\0\0\0\0\0\0\0\0\0\0\0\0"..., 1048576, 1070596096) = 1048576
pwrite(5, "\0\0\0\0\0\0\0\0\0\0\0\0\0\0\0\0\0\0\0\0\0\0\0\0\0\0\0\0\0\0\0\0"..., 1048576, 1071644672) = 1048576
pwrite(5, "\0\0\0\0\0\0\0\0\0\0\0\0\0\0\0\0\0\0\0\0\0\0\0\0\0\0\0\0\0\0\0\0"..., 1048576, 1072693248) = 1048576
fsync(5)                                = 0
close(5)                                = 0
  • Here we see that it checks to see if file j._0 exists, and then goes onto rename file prealloc.0 to j._0
"Journal Files (e.g. journal/j._0)

Journal files are append-only and are written to the journal/ directory under the dbpath directory (which is /data/db/ by default).

Journal files are named j._0, j._1, etc. When a journal file reached 1GB in size, a new file is created. Old files which are no longer needed are rotated out (automatically deleted). Unless your write bytes/second rate is extremely high, you should have only two or three journal files.

Note: in more recent versions, the journal files are only 128MB apiece when using the --smallfiles command line option."
From MongoDb docs: http://www.mongodb.org/display/DOCS/Journaling+Administration+Notes#JournalingAdministrationNotes-PreallocFiles%28e.g.journal%2Fprealloc.0%29

stat("/data/db/journal/j._0", 0x7fffc6e6e350) = -1 ENOENT (No such file or directory)
rename("/data/db/journal/prealloc.0", "/data/db/journal/j._0") = 0
  • Here we see that the domain parameter for the socket() is PF_INET ie. IPv4 Internet protocol. SOCK_STREAM provides sequenced, reliable, two-way, connection-based byte streams. Also, we see that the port used is 27017
socket(PF_INET, SOCK_STREAM, IPPROTO_IP) = 7
setsockopt(7, SOL_SOCKET, SO_REUSEADDR, [1], 4) = 0
bind(7, {sa_family=AF_INET, sin_port=htons(27017), sin_addr=inet_addr("0.0.0.0")}, 16) = 0
listen(7, 128)                          = 0
socket(PF_FILE, SOCK_STREAM, 0)         = 8
unlink("/tmp/mongodb-27017.sock")       = -1 ENOENT (No such file or directory)
setsockopt(8, SOL_SOCKET, SO_REUSEADDR, [1], 4) = 0
bind(8, {sa_family=AF_FILE, path="/tmp/mongodb-27017.sock"...}, 110) = 0
chmod("/tmp/mongodb-27017.sock", 0777)  = 0
listen(8, 128)                          = 0
write(1, "Fri Oct 26 15:08:36 [initandlist"..., 74) = 74


Wednesday, September 12, 2012

Oracle Enterprise Manager: Cannot communicate securely with peer: no common encryption algorithm(s). (Error code: ssl_error_no_cypher_overlap)

When attempting to connect to the Oracle Enterprise Manager using  Firefox 15.0.1 or later, the following message is displayed:
Cannot communicate securely with peer: no common encryption algorithm(s).  (Error code: ssl_error_no_cypher_overlap)


Solution
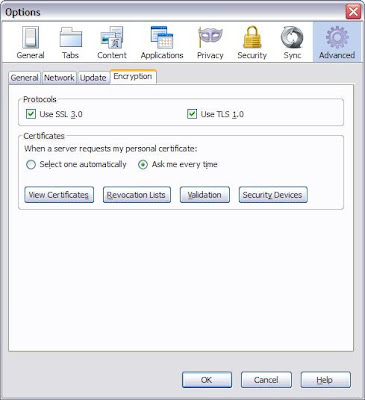
To allow secure connection to the Oracle Enterprise Manager with Firefox 15.0.1 and later, you must ensure that TLS has been enabled.

To do this, complete the following steps:

        In Firefox, click Tools > Options.
        In the Options notebook, click the Advanced tab.
        Click the Encryption tab.
        In the Protocols section, click Use TLS 1.0.
        Click OK.


Attempt to re-connect to the Oracle Enterprise Manager page. An Untrusted Connection message is displayed.
        Click Add Exception. The Add Security Exception window is displayed.
        Click Confirm Security Exception. The Oracle Enterprise Manager page is displayed


Monday, September 10, 2012

Accessing GUI running on AIX using putty


I usually use putty to access my remote AIX server, and then I stat the vnc server on it and connect from my Windows XP laptop using the vnc client to access any GUI like the Oracle runInstaller, etc.

There are time when I would have to connect to a remote AIX machine which does not have vncserver on it, so at that time I would access the GUI from putty using ssh X11 forwarding.

For this the pre-requisite is to have ssh and ssl installed and running on the AIX server. Open SSH and Open SSL can be installed on an AIX 7.1 host following the steps in my earlier post http://shettymayur.blogspot.com/2012/09/open-secure-shellssh-and-open-secure.html

With the help of the instructions on the following links http://mynotes.wordpress.com/2009/12/11/setting-x-display-using-putty-and-xming/ and http://tacomadata.com/node/15 I was able to able to access the GUI (xclock, runinstaller, etc.)

Configuring PuTTY:
Using putty I created an SSH session to access the AIX server.


Configuring Xming:
Install Xming from http://sourceforge.net/projects/xming/
On starting Xming you should see this at the bottom panned on your Windows XP machine.


Configure sshd on AIX:
Edit /etc/ssh/sshd_config , uncomment and add the following:

X11Forwarding yes
X11UseLocalhost yes
XauthLocation /usr/bin/X11/xauth

Connect to the AIX host test.ibm.com using the ssh session that was created earlier, and call xclock to test. Xclock should be displayed on the Windows machine.

test> echo $DISPLAY
localhost:10.0
test> xclock

Saturday, September 8, 2012

Open Secure Shell(SSH) and Open Secure Socket Layer(SSL) on AIX 7.1

I installed Open Secure Shell(SSH) and Open Secure Socket Layer(SSL) on my AIX 7.1 host, but when I did a sshd -V I got the below error message.

isvp14_ora> /usr/sbin/sshd -V
OpenSSL version mismatch. Built against 908070, you have 90812f

Here we see the list of SSH and SSL software that is currently installed on the AIX host.

isvp14_ora> lslpp -l | grep ssh
  openssh.base.server     4.7.0.5301  COMMITTED  Open Secure Shell Server
isvp14_ora> lslpp -l | grep openssh
  openssh.base.server     4.7.0.5301  COMMITTED  Open Secure Shell Server
isvp14_ora> lslpp -l | grep ssl
  openssl.base            0.9.8.1802  COMMITTED  Open Secure Socket Layer
  openssl.license         0.9.8.1802  COMMITTED  Open Secure Socket License
  openssl.man.en_US       0.9.8.1802  COMMITTED  Open Secure Socket Layer
  openssl.base            0.9.8.1802  COMMITTED  Open Secure Socket Layer
isvp14_ora>

I deleted the SSH solftware and started afresh with the compatible versions, by installing
from OpenSSH_5.8.0.6102.tar I got the from
http://www-03.ibm.com/systems/power/software/aix/expansionpack/index.html

On untarring OpenSSH_5.8.0.6102.tar I saw the following files in the directory.

isvp14_ora> ls
.toc                    openssh.msg.Ja_JP       openssh.msg.es_ES
OpenSSH_5.8.0.6102.tar  openssh.msg.KO_KR       openssh.msg.fr_FR
openssh.base            openssh.msg.PL_PL       openssh.msg.hu_HU
openssh.license         openssh.msg.PT_BR       openssh.msg.it_IT
openssh.man.en_US       openssh.msg.RU_RU       openssh.msg.ja_JP
openssh.msg.CA_ES       openssh.msg.SK_SK       openssh.msg.ko_KR
openssh.msg.CS_CZ       openssh.msg.ZH_CN       openssh.msg.pl_PL
openssh.msg.DE_DE       openssh.msg.ZH_TW       openssh.msg.pt_BR
openssh.msg.EN_US       openssh.msg.Zh_CN       openssh.msg.ru_RU
openssh.msg.ES_ES       openssh.msg.Zh_TW       openssh.msg.sk_SK
openssh.msg.FR_FR       openssh.msg.ca_ES       openssh.msg.zh_CN
openssh.msg.HU_HU       openssh.msg.cs_CZ       openssh.msg.zh_TW
openssh.msg.IT_IT       openssh.msg.de_DE       openssl-0.9.8.1802
openssh.msg.JA_JP       openssh.msg.en_US       openssl-0.9.8.1802.tar

I then installed the openssh.base using smitty, here is the new version of ssh on the AIX machine.
NOTE: Remember to accept the license agreement while installing using smitty.

isvp14_ora> lslpp -l | grep ssh
  openssh.base.client     5.8.0.6102  COMMITTED  Open Secure Shell Commands
  openssh.base.server     5.8.0.6102  COMMITTED  Open Secure Shell Server
  openssh.license         5.8.0.6102  COMMITTED  Open Secure Shell License
  openssh.man.en_US       5.8.0.6102  COMMITTED  Open Secure Shell
  openssh.msg.en_US       5.8.0.6102  COMMITTED  Open Secure Shell Messages -
  openssh.base.client     5.8.0.6102  COMMITTED  Open Secure Shell Commands
  openssh.base.server     5.8.0.6102  COMMITTED  Open Secure Shell Server
isvp14_ora>

isvp14_ora> /usr/sbin/sshd -V
sshd: illegal option -- V
OpenSSH_5.8p1, OpenSSL 0.9.8r 8 Feb 2011
usage: sshd [-46Ddeiqt] [-b bits] [-f config_file] [-g login_grace_time]
                           [-h host_key_file] [-k key_gen_time] [-o option] [-p port] [-u len]
isvp14_ora>  


To configure passwordless ssh on Oracle RAC nodes here is link to the Oracle docs that talk about it.
http://docs.oracle.com/cd/E11882_01/install.112/e24614/manpreins.htm

Thursday, September 6, 2012

Oracle Advanced Compression using Swingbench Order Entry Schema with Scale Factor 100

In this entry I will talk about my experience using Swingbench Version 2.4.0.845 where I used Oracle Advanced Compression while creating the Order Entry Schema with scale factor 100

Here is the Order Entry schema diagram that I reverse engineered using DbWrench


bash-3.2$ sqlplus / as sysdba

SQL*Plus: Release 11.2.0.1.0 Production on Mon Aug 27 09:14:53 2012

Copyright (c) 1982, 2009, Oracle.  All rights reserved.


Connected to:
Oracle Database 11g Enterprise Edition Release 11.2.0.1.0 - 64bit Production
With the Partitioning, Automatic Storage Management, OLAP, Data Mining
and Real Application Testing options


We can see all the tablespaces that are part of the database.

SQL> select tablespace_name from dba_tablespaces;

TABLESPACE_NAME
------------------------------
SYSTEM
SYSAUX
UNDOTBS1
TEMP
USERS
SOE

6 rows selected.

The Swingbench user is called SOE, so here we look into all the tables owner by that user 

SQL> select table_name from dba_tables where owner='SOE' and partitioned='NO' ;

TABLE_NAME
------------------------------
CUSTOMERS
WAREHOUSES
ORDER_ITEMS
ORDERS
INVENTORIES
PRODUCT_INFORMATION
LOGON
PRODUCT_DESCRIPTIONS
ORDERENTRY_METADATA

9 rows selected.

Below we see the file id and file name that is being used by the tablespace SOE
SQL> select distinct ddf.file_id "File ID", ddf.file_name "File Name" from dba_extents de, dba_data_files ddf where de.file_id = ddf.file_id and ddf.tablespace_name = 'SOE';

   File ID
----------
File Name
--------------------------------------------------------------------------------
         5
+DATA/testdb/datafile/soe.dbf

Now we check to see if Compression has been enabled, and the kink of compression we are using.
SQL> SELECT TABLE_NAME, COMPRESSION, COMPRESS_FOR FROM dba_tables where owner='SOE';

TABLE_NAME                     COMPRESS COMPRESS_FOR
------------------------------ -------- ------------
CUSTOMERS                      ENABLED  OLTP
WAREHOUSES                     ENABLED  OLTP
ORDER_ITEMS                    ENABLED  OLTP
ORDERS                         ENABLED  OLTP
INVENTORIES                    ENABLED  OLTP
PRODUCT_INFORMATION            ENABLED  OLTP
LOGON                          ENABLED  OLTP
PRODUCT_DESCRIPTIONS           ENABLED  OLTP
ORDERENTRY_METADATA            DISABLED

9 rows selected.

Below we see all the indxes associated with each of the table created for the Order Entry Schema
SQL> select TABLE_NAME, INDEX_NAME from dba_indexes where OWNER='SOE';

TABLE_NAME                     INDEX_NAME
------------------------------ ------------------------------
CUSTOMERS                      CUSTOMERS_PK
CUSTOMERS                      CUST_UPPER_NAME_IX
CUSTOMERS                      CUST_ACCOUNT_MANAGER_IX
CUSTOMERS                      CUST_LNAME_IX
CUSTOMERS                      CUST_EMAIL_IX
INVENTORIES                    INVENTORY_PK
INVENTORIES                    INV_PRODUCT_IX
INVENTORIES                    INV_WAREHOUSE_IX
ORDERS                         ORDER_PK
ORDERS                         ORD_CUSTOMER_IX
ORDERS                         ORD_SALES_REP_IX

TABLE_NAME                     INDEX_NAME
------------------------------ ------------------------------
ORDERS                         ORD_ORDER_DATE_IX
ORDERS                         ORD_WAREHOUSE_IX
ORDER_ITEMS                    ORDER_ITEMS_PK
ORDER_ITEMS                    ITEM_ORDER_IX
ORDER_ITEMS                    ITEM_PRODUCT_IX
PRODUCT_DESCRIPTIONS           PRD_DESC_PK
PRODUCT_DESCRIPTIONS           PROD_NAME_IX
PRODUCT_INFORMATION            PRODUCT_INFORMATION_PK
PRODUCT_INFORMATION            PROD_CATEGORY_IX
PRODUCT_INFORMATION            PROD_SUPPLIER_IX
WAREHOUSES                     WAREHOUSES_PK

TABLE_NAME                     INDEX_NAME
------------------------------ ------------------------------
WAREHOUSES                     WHS_LOCATION_IX

23 rows selected.

Here we check to see if compression has been enabled for each of the indexes associated with the table.
SQL> select INDEX_NAME , TABLE_NAME, COMPRESSION from dba_indexes where OWNER='SOE';

INDEX_NAME                     TABLE_NAME                     COMPRESS
------------------------------ ------------------------------ --------
CUSTOMERS_PK                   CUSTOMERS                      DISABLED
CUST_UPPER_NAME_IX             CUSTOMERS                      DISABLED
CUST_ACCOUNT_MANAGER_IX        CUSTOMERS                      DISABLED
CUST_LNAME_IX                  CUSTOMERS                      DISABLED
CUST_EMAIL_IX                  CUSTOMERS                      DISABLED
INVENTORY_PK                   INVENTORIES                    DISABLED
INV_PRODUCT_IX                 INVENTORIES                    DISABLED
INV_WAREHOUSE_IX               INVENTORIES                    DISABLED
ORDER_PK                       ORDERS                         DISABLED
ORD_CUSTOMER_IX                ORDERS                         DISABLED
ORD_SALES_REP_IX               ORDERS                         DISABLED

INDEX_NAME                     TABLE_NAME                     COMPRESS
------------------------------ ------------------------------ --------
ORD_ORDER_DATE_IX              ORDERS                         DISABLED
ORD_WAREHOUSE_IX               ORDERS                         DISABLED
ORDER_ITEMS_PK                 ORDER_ITEMS                    DISABLED
ITEM_ORDER_IX                  ORDER_ITEMS                    DISABLED
ITEM_PRODUCT_IX                ORDER_ITEMS                    DISABLED
PRD_DESC_PK                    PRODUCT_DESCRIPTIONS           DISABLED
PROD_NAME_IX                   PRODUCT_DESCRIPTIONS           DISABLED
PRODUCT_INFORMATION_PK         PRODUCT_INFORMATION            DISABLED
PROD_CATEGORY_IX               PRODUCT_INFORMATION            DISABLED
PROD_SUPPLIER_IX               PRODUCT_INFORMATION            DISABLED
WAREHOUSES_PK                  WAREHOUSES                     DISABLED

INDEX_NAME                     TABLE_NAME                     COMPRESS
------------------------------ ------------------------------ --------
WHS_LOCATION_IX                WAREHOUSES                     DISABLED

23 rows selected.

The below sql statement gives us more information on the number of rows in each of the tables, and the number of blocks used by the table.
SQL> SELECT table_name, NUM_ROWS, blocks as BLOCKS_USED, empty_blocks FROM dba_tables WHERE owner='SOE';

TABLE_NAME                       NUM_ROWS BLOCKS_USED EMPTY_BLOCKS
------------------------------ ---------- ----------- ------------
CUSTOMERS                       400000000     3906292            0
WAREHOUSES                           1000          60            0
ORDER_ITEMS                    1350084849     3972147            0
ORDERS                          450000000     3233681            0
INVENTORIES                        899915       20941            0
PRODUCT_INFORMATION                  1000          60            0
LOGON                           100000000      176240            0
PRODUCT_DESCRIPTIONS                 1000          60            0
ORDERENTRY_METADATA                     4          60            0

9 rows selected.

SQL>

Here we look to see the size of each of the table in KB. 
As per this excellent article by Burleson Consulting  you need to ask yourself exactly which Oracle table size, you wish to query:
  • Do you want only the row space consumed? ( select avg_row_len*num_rows from dba_tables)
  • Do you want to include allocated file space for the table? (select . . . from dba_segments)
  • Do you want to include un-used extent space? (select . . . from dba_data_files, dba_extents . . )
  • Do you want to include un-used space up to the high water mark? This may over-estimate the real Oracle table size.
  • Do you want table sizes for Oracle growth monitoring?
The query below gives us the size in terms of number of row space consumed
 

SQL> select TABLE_NAME, ROUND((AVG_ROW_LEN * NUM_ROWS / 1024), 2) SIZE_KB from dba_tables WHERE owner='SOE';

TABLE_NAME                        SIZE_KB
------------------------------ ----------
CUSTOMERS                        30859375
WAREHOUSES                          26.37
ORDER_ITEMS                    27687286.9
ORDERS                         21972656.3
INVENTORIES                      12303.53
PRODUCT_INFORMATION                172.85
LOGON                          1269531.25
PRODUCT_DESCRIPTIONS               210.94
ORDERENTRY_METADATA                    .1

9 rows selected.

SQL>

The query below gives the table size that includes the unused extents space

 SQL>  select segment_name table_name, sum(bytes)/(1024) table_size_kb from user_extents where segment_type='TABLE' and segment_name = 'CUSTOMERS' group by segment_name;

TABLE_NAME
--------------------------------------------------------------------------------
TABLE_SIZE_KB
-------------
CUSTOMERS
     31885312

Using the function written Anantha Narayanana 

SQL>  CREATE OR REPLACE FUNCTION get_table_size
  2  (t_table_name VARCHAR2)RETURN NUMBER IS
  3  l_size NUMBER;
  4  BEGIN
  5  SELECT sum(bytes)/(1024)
INTO l_size  6
  7  FROM user_extents
  8  WHERE segment_type='TABLE'
  9  AND segment_name = t_table_name;
 10
 11  RETURN l_size;
 12  EXCEPTION
 13  WHEN OTHERS THEN
 14  RETURN NULL;
 15  END;
 16  /

Function created.

SQL> SELECT get_table_size('CUSTOMERS') Table_Size from dual;

TABLE_SIZE
----------
  31885312

SQL>

Wednesday, July 11, 2012

ORA-1652: unable to extend temp segment by 128 in tablespace TEMP

I was in the process of creating the Swingbench Order Entry Schema with scale factor 100 when I noticed that the schema creation failed.

On looking at the alert log, I found the following message:
Tue Jul 10 21:47:51 2012
ORA-1652: unable to extend temp segment by 128 in tablespace                 TEMP
Tue Jul 10 21:47:53 2012
Errors in file /u01/app/oracle/diag/rdbms/testdb/testdb/trace/testdb_ora_37158936.trc  (incident=2745):
ORA-04030: out of process memory when trying to allocate 64544 bytes (sort subheap,sort key)
Incident details in: /u01/app/oracle/diag/rdbms/testdb/testdb/incident/incdir_2745/testdb_ora_37158936_i2745.trc
Errors in file /u01/app/oracle/diag/rdbms/testdb/testdb/trace/testdb_ora_37158936.trc  (incident=2746):
ORA-04030: out of process memory when trying to allocate 169040 bytes (pga heap,kgh stack)

Fix:
The oewizard had suggested that a schema of scale factor 100 needs around 60 GB of temp file space.
My host machine(database server) did have 16GB of memory, so I didn't make any changes to it.

So I just added the tempfiles as follows:
SQL> alter tablespace temp add tempfile '/orcldata/testdb/temp02.dbf' size 31G;

Tablespace altered.

SQL> alter tablespace temp add tempfile '/orcldata/testdb/temp03.dbf' size 31G;

Tablespace altered.

SQL> alter tablespace temp add tempfile '/orcldata/testdb/temp04.dbf' size 31G;

Tablespace altered.

SQL> select FILE_NAME, (bytes)/1024/1024 from dba_temp_files;

FILE_NAME
--------------------------------------------------------------------------------
(BYTES)/1024/1024
-----------------
/orcldata/testdb/temp01.dbf
               20

/orcldata/testdb/temp02.dbf
            31744

/orcldata/testdb/temp03.dbf
            31744

/orcldata/testdb/temp04.dbf
            31744

This fixed the issue.

Friday, May 18, 2012

JFS2 options for Oracle database

JFS2 Filesystem is pretty much the filesystem on choice for an Oracle database running on AIX. The question that always comes up is, what filesystems options should I use when using it for an Oracle database.

Here is what Oracle recommend:
Oracle database file JFS2 Filesystem options
Control Files cio
Data Files cio
Log Files cio, agblksize=512

ORACLE_HOME
cio option not supported

How to create a file system for the Oracle logs with agblksize=512
# mkfs -s <fs_size> -o agblksize=512 /ora_log

# mount /ora_log

How do you update an existing jfs2 filesystem to have the cio option:
chfs -a options=cio /ora_data   

With Oracle 11g we can enable dio and cio on jfs2 at file level. This is done by setting the FILESYSTEMIO_OPTIONS parameter in the server parameter file to setall or directIO. This enables Concurrent Input-Output on JFS2.

SQL> ALTER SYSTEM SET FILESYSTEMIO_OPTIONS=SETALL SCOPE=SPFILE;

System altered.

SQL> SHOW PARAMETER FILESYSTEMIO_OPTIONS

NAME                                 TYPE        VALUE
------------------------------------ ----------- ------------------------------
filesystemio_options                 string    SETALL


setall enables both direct/IO and asynchronous I/O wherever possible.

Oracle Database logs files should be on a separate JFS2 file system for optimal performance.

Here are some good links talk about jfs2 and Oracle:
http://docs.oracle.com/cd/E11882_01/server.112/e10839/appa_aix.htm
http://haveyoutriedtoswitchitonandoff.blogspot.com/2009/08/tuning-jfs2-for-oracle.html

Tuesday, May 8, 2012

Oracle Flashback does not work for tables on the system tablespace

I was playing around with Oracle Flashback, to see when what happens when we have flashback enabled and we drop a table and on how it can be retrieved.

I connected to the database as user sys
bash-3.2$ sqlplus / as sysdba

SQL*Plus: Release 11.1.0.6.0 - Production on Tue May 8 10:33:43 2012

Copyright (c) 1982, 2007, Oracle.  All rights reserved.


Connected to:
Oracle Database 11g Enterprise Edition Release 11.1.0.6.0 - 64bit Production
With the Partitioning, OLAP, Data Mining and Real Application Testing options

SQL> show user;
USER is "SYS"
SQL>

I then did the following to start using Flashback. I first put the database in archivelog mode, and then set up
the DB_FLASHBACK_RETENTION_TARGET, DB_RECOVERY_FILE_DEST_SIZE, and DB_RECOVERY_FILE_DEST

SQL> shutdown immediate;

Database closed.
Database dismounted.
ORACLE instance shut down.
SQL>
SQL> startup mount;
ORACLE instance started.

Total System Global Area 6948155392 bytes
Fixed Size                  2138944 bytes
Variable Size            3758099648 bytes
Database Buffers         3154116608 bytes
Redo Buffers               33800192 bytes
Database mounted.
SQL>
SQL>  alter database archivelog;

Database altered.


The flashback retention was set for 2880 minutes(2 days), with a recovery destination size of 4 G, on filesystem /bigfs.


SQL> alter system set DB_FLASHBACK_RETENTION_TARGET=2880;

System altered.

SQL> alter system set DB_RECOVERY_FILE_DEST_SIZE=4G;

System altered.

SQL> alter system set DB_RECOVERY_FILE_DEST='/bigfs';

System altered.

SQL> alter database flashback off;

Database altered.

SQL> alter database flashback on;

Database altered.

SQL> alter database open;

Database altered.

SQL>

After the database was opened I created a table called beatles_table, and entered some data into it.

 SQL> create table beatles_table (
  2  id number(2),
  3  name varchar2(30)
  4  );


SQL> insert into beatles_table values (1, 'John');

1 row created.

SQL> insert into beatles_table values (2, 'Paul');

1 row created.

SQL> insert into beatles_table values (3, 'George');

1 row created.

SQL> insert into beatles_table values (4, 'Ringo');

1 row created.

SQL>

As we see the owner of the table is SYS and the table is on the system tablespace

SQL> select owner, table_name, tablespace_name
  2  from all_tables where
  3  table_name='BEATLES_TABLE';

OWNER                          TABLE_NAME
------------------------------ ------------------------------
TABLESPACE_NAME
------------------------------
SYS                            BEATLES_TABLE
SYSTEM


SQL>


SQL> drop table BEATLES_TABLE;

Table dropped.

SQL>

SQL> flashback table "BEATLES_TABLE" to before drop;
flashback table "BEATLES_TABLE" to before drop
*
ERROR at line 1:
ORA-38305: object not in RECYCLE BIN


SQL> select * from RECYCLEBIN;

no rows selected

SQL>

SQL> select * from DBA_RECYCLEBIN where ORIGINAL_NAME='BEATLES_TABLE';

no rows selected

SQL>
SQL> select * from BEATLES_TABLE;
select * from BEATLES_TABLE
              *
ERROR at line 1:
ORA-00942: table or view does not exist


SQL>


SQL> create table beatles_table (
  2  id number(2),
  3  name varchar2(30)
  4  ) tablespace users;


Table created.

SQL> SQL> select owner, table_name, tablespace_name
  2  from all_tables where
  3  table_name='BEATLES_TABLE';

OWNER                          TABLE_NAME
------------------------------ ------------------------------
TABLESPACE_NAME
------------------------------
SYS                            BEATLES_TABLE
USERS


SQL> insert into beatles_table values (1, 'John');

1 row created.

SQL> insert into beatles_table values (2, 'Paul');

1 row created.

SQL> insert into beatles_table values (3, 'George');

1 row created.

SQL> insert into beatles_table values (4, 'Ringo');

1 row created.

SQL>


SQL> drop table BEATLES_TABLE;

Table dropped.

SQL> select * from RECYCLEBIN;

OBJECT_NAME                    ORIGINAL_NAME                    OPERATION
------------------------------ -------------------------------- ---------
TYPE                      TS_NAME                        CREATETIME
------------------------- ------------------------------ -------------------
DROPTIME               DROPSCN PARTITION_NAME                   CAN CAN
------------------- ---------- -------------------------------- --- ---
   RELATED BASE_OBJECT PURGE_OBJECT      SPACE
---------- ----------- ------------ ----------
BIN$v4sirVl4AHrgQwkLUw0Aeg==$0 BEATLES_TABLE                    DROP
TABLE                     USERS                          2012-05-08:10:57:50
2012-05-08:10:58:35    2786532                                  YES YES
     72633       72633        72633          8


SQL> select * from BEATLES_TABLE;
select * from BEATLES_TABLE
              *
ERROR at line 1:
ORA-00942: table or view does not exist


SQL> flashback table "BEATLES_TABLE" to before drop;


Flashback complete.

SQL> select * from BEATLES_TABLE;

        ID NAME
---------- ------------------------------
         1 John
         2 Paul
         3 George
         4 Ringo


SQL>

SQL> select * from RECYCLEBIN;

no rows selected

SQL>

Tuesday, April 3, 2012

DBUA hangs with ORA-19815 , ORA-19809 ,and ORA-19804

I was upgrading from Oracle 11.1.0.6.0 to Oracle 11.2.0.1.0 using dbua when I noticed that around 84% at "Upgrading Oracle Java Packages" dbua was hung.


On looking at alter log showed the following message:

bash-3.2$ tail -f ./app/oracle/diag/rdbms/testdb/testdb/trace/alert_testdb.log

Tue Apr 03 22:21:38 2012
Errors in file /u02/app/oracle/diag/rdbms/testdb/testdb/trace/testdb_arc1_30212224.trc:
ORA-19815: WARNING: db_recovery_file_dest_size of 2147483648 bytes is 100.00% used, and has 0 remaining bytes available.
************************************************************************
You have following choices to free up space from recovery area:
1. Consider changing RMAN RETENTION POLICY. If you are using Data Guard,
   then consider changing RMAN ARCHIVELOG DELETION POLICY.
2. Back up files to tertiary device such as tape using RMAN
   BACKUP RECOVERY AREA command.
3. Add disk space and increase db_recovery_file_dest_size parameter to
   reflect the new space.
4. Delete unnecessary files using RMAN DELETE command. If an operating
   system command was used to delete files, then use RMAN CROSSCHECK and
   DELETE EXPIRED commands.
************************************************************************
Errors in file /u02/app/oracle/diag/rdbms/testdb/testdb/trace/testdb_arc1_30212224.trc:
ORA-19809: limit exceeded for recovery files
ORA-19804: cannot reclaim 36977152 bytes disk space from 2147483648 limit
ARC1: Error 19809 Creating archive log file to '/oraarc/TESTDB/archivelog/2012_04_03/o1_mf_1_60_%u_.arc'

Fix:

DB_RECOVERY_FILE_DEST_SIZE specifies (in bytes) the hard limit on the total space to be used by target database recovery files created in the fast recovery area.

After setting the ORACLE_HOME to 11gR2 and ORACLE_SID=testdb I found that the current size of "db_recovery_file_dest_size" was 2G. So I increased it to 10G.


bash-3.2$ sqlplus / as sysdba

SQL*Plus: Release 11.2.0.1.0 Production on Tue Apr 3 22:26:52 2012

Copyright (c) 1982, 2009, Oracle.  All rights reserved.


Connected to:
Oracle Database 11g Enterprise Edition Release 11.2.0.1.0 - 64bit Production
With the Partitioning, OLAP, Data Mining and Real Application Testing options

SQL> show parameter db_recovery_file_dest_size;

NAME                                 TYPE        VALUE
------------------------------------ ----------- ------------------------------
db_recovery_file_dest_size           big integer 2G
SQL>


SQL> ALTER SYSTEM SET db_recovery_file_dest_size='10G';

System altered.

SQL>

I noticed in the alter log the "Archiver process freed from errors. No longer stopped" message.


bash-3.2$ tail -f ./app/oracle/diag/rdbms/testdb/testdb/trace/alert_testdb.log

ALTER SYSTEM SET db_recovery_file_dest_size='10G' SCOPE=MEMORY;
Tue Apr 03 22:29:06 2012
db_recovery_file_dest_size of 10240 MB is 19.99% used. This is a
user-specified limit on the amount of space that will be used by this
database for recovery-related files, and does not reflect the amount of
space available in the underlying filesystem or ASM diskgroup.
Tue Apr 03 22:29:37 2012
Archived Log entry 64 added for thread 1 sequence 60 ID 0xffffffff98badd37 dest 1:
Archiver process freed from errors. No longer stopped
Tue Apr 03 22:29:37 2012
Thread 1 advanced to log sequence 63 (LGWR switch)
  Current log# 3 seq# 63 mem# 0: /oradb/testdb/redo03.log
Archived Log entry 65 added for thread 1 sequence 61 ID 0xffffffff98badd37 dest 1:
Tue Apr 03 22:29:38 2012
Archived Log entry 66 added for thread 1 sequence 62 ID 0xffffffff98badd37 dest 1:
Tue Apr 03 22:29:57 2012
SERVER COMPONENT id=ORDIM: status=VALID, version=11.2.0.1.0, timestamp=2012-04-03 22:29:57
Tue Apr 03 22:29:57 2012
Thread 1 advanced to log sequence 64 (LGWR switch)
  Current log# 1 seq# 64 mem# 0: /oradb/testdb/redo01.log
Tue Apr 03 22:29:57 2012
Archived Log entry 67 added for thread 1 sequence 63 ID 0xf

After that dbua proceeded file, and completed with the upgrade from Oracle 11.1.0.6.0 to Oracle 11.2.0.1.0

Wednesday, March 28, 2012

Increasing the jfs2 file system size on AIX beyond 64GB

In my earlier post I talk about increasin the size of a file system on AIX

http://shettymayur.blogspot.com/2011/01/how-to-increase-file-system-size-on-aix.html

In this post I created a 100GB SAN volume, which I mapped to my AIX 7.1 host.

Using smitty I created a 64GB jfs2 file system on the volume.


/dev/fslv02       64.00     52.61   18%     5459     1% /bigfs
isvp14_ora> lslv fslv02
LOGICAL VOLUME:     fslv02                 VOLUME GROUP:   bigfs
LV IDENTIFIER:      00f62a6b00004c0000000136568e8fcf.2 PERMISSION:     read/write
VG STATE:           active/complete        LV STATE:       opened/syncd
TYPE:               jfs2                   WRITE VERIFY:   off
MAX LPs:            512                    PP SIZE:        128 megabyte(s)
COPIES:             1                      SCHED POLICY:   parallel
LPs:                512                    PPs:            512
STALE PPs:          0                      BB POLICY:      relocatable
INTER-POLICY:       minimum                RELOCATABLE:    yes
INTRA-POLICY:       middle                 UPPER BOUND:    32
MOUNT POINT:        /bigfs                 LABEL:          /bigfs
MIRROR WRITE CONSISTENCY: on/ACTIVE
EACH LP COPY ON A SEPARATE PV ?: yes
Serialize IO ?:     NO
isvp14_ora>

The volume that was mapped to the host was 100GB, but when I tried to increase the file system size beyond 64GB I get the below message.

isvp14_ora> chfs -a size=90G /bigfs
0516-787 extendlv: Maximum allocation for logical volume fslv02 is 512.

We see that it's complaining that the maximum number LP is 512. LV can go up to 512 LPs, each LP is 128 MB , so  512 x 128MB= 64 GB

Below we below see the command to increase the LPs to 1024, this will give us a max file system of 128 GB


isvp14_ora> chlv -x'1024' fslv02
isvp14_ora> lslv fslv02
LOGICAL VOLUME:     fslv02                 VOLUME GROUP:   bigfs
LV IDENTIFIER:      00f62a6b00004c0000000136568e8fcf.2 PERMISSION:     read/write
VG STATE:           active/complete        LV STATE:       opened/syncd
TYPE:               jfs2                   WRITE VERIFY:   off
MAX LPs:            1024                   PP SIZE:        128 megabyte(s)
COPIES:             1                      SCHED POLICY:   parallel
LPs:                512                    PPs:            512
STALE PPs:          0                      BB POLICY:      relocatable
INTER-POLICY:       minimum                RELOCATABLE:    yes
INTRA-POLICY:       middle                 UPPER BOUND:    32
MOUNT POINT:        /bigfs                 LABEL:          /bigfs
MIRROR WRITE CONSISTENCY: on/ACTIVE
EACH LP COPY ON A SEPARATE PV ?: yes
Serialize IO ?:     NO

isvp14_ora> chfs -a size=90G /bigfs
Filesystem size changed to 188743680
isvp14_ora> df -g
/dev/fslv02       90.00     78.60   13%     5459     1% /bigfs